
Jamf Pro
Jamf Pro is an API integration. Connect it before you export a file. If you can’t, the export at the end of this page takes installed applications from Jamf-managed macOS devices, through the Jamf Pro web console or the Jamf Pro REST API, with the fields the SIM template needs.
Create credentials in Jamf Pro
Section titled “Create credentials in Jamf Pro”In Jamf Pro, click Settings, then API roles and clients in the System section. On API Roles, create a role with the Read Computers privilege. Jamf lists it as the privilege for computer inventory, which includes installed applications. On API Clients, click New, add the role and click Save, then click Edit, Enable API Client and Save. Generate the client secret, and copy the client ID and the client secret. The secret is shown once. Jamf’s steps: Creating an API client. API reference: Jamf Pro API.
Connect in Licenseware
Section titled “Connect in Licenseware”- Open Datasources from the sidebar and click Jamf Pro.
- Click Connect. Documentation is at the top right of the source page.
- Fill the required fields. Each one is marked with *.
- Instance URL. The placeholder is
https://yourcompany.jamfcloud.com. - Client ID
- Client Secret
- Instance URL. The placeholder is
- Verify connection and Save credentials stay disabled until every required field is filled. Click Verify connection first, then Save credentials.
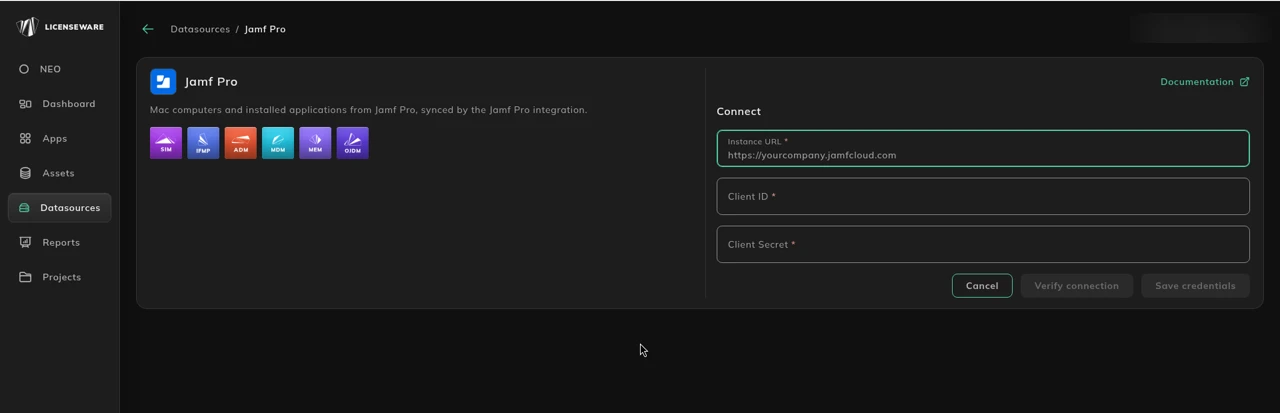
See Data sources for how to check a connection.
If you can’t connect
Section titled “If you can’t connect”Jamf Pro stores device and software data within its inventory database. The key sources of information are:
- Computers (Inventory): Contains device details such as name, ID, and operating system.
- Applications (Installed Software): Lists installed software on each computer, including name, version, and vendor/publisher.
These datasets can be retrieved through the Jamf Pro Console (UI) or via the Jamf Pro API.
Prerequisites
Section titled “Prerequisites”For console (UI) method
Section titled “For console (UI) method”- Access to the Jamf Pro Admin Console with permissions to view Computer Inventory.
- All managed devices must have completed a recent inventory update (via
jamf recon). - Permission to export data from Inventory Reports.
For API method
Section titled “For API method”- Administrative or API access to the Jamf Pro Server.
- Jamf Pro API credentials (username and password or Bearer Token).
- Network access to the Jamf Pro server URL (e.g.,
https://yourcompany.jamfcloud.com). - A working environment with PowerShell, curl, or Postman to send API requests.
You can extract software inventory data using either of the two methods below.
Export methods
Section titled “Export methods”Option 1: Jamf Pro console export (UI)
Section titled “Option 1: Jamf Pro console export (UI)”This method is ideal for quick, manual exports.
- Log in to the Jamf Pro Console.
- Navigate to: Computers → Inventory → Reports.
- Select New Advanced Search.
- Under Display Fields, add the following:
- Computer Name
- Application Name
- Application Version
- Application Publisher (if available)
- Click Save & View Results.
- From the report view, click Export → CSV.
- Save the file as
JamfPro_SIM_Export.csv.
Note: If the publisher field is not available, it can be left blank or mapped manually during import.
Option 2: Jamf Pro REST API export (recommended for automation)
Section titled “Option 2: Jamf Pro REST API export (recommended for automation)”For automated or large-scale environments, use the Jamf Pro REST API.
Step 1: Authenticate to Jamf Pro API
# Jamf Pro SIM Template Export Script# Replace with your Jamf Pro server details
$JamfUrl = "https://yourcompany.jamfcloud.com"$Username = "api_user"$Password = "api_password"
# Obtain authentication token$AuthResponse = Invoke-RestMethod -Uri "$JamfUrl/api/v1/auth/token" -Method POST -Headers @{    "Accept" = "application/json"} -Body @{    username = $Username    password = $Password}$Token = $AuthResponse.token
Step 2: Retrieve Device and Application Data
# Set request headers$Headers = @{    "Authorization" = "Bearer $Token"    "Accept" = "application/json"}
# Get list of computers$Computers = Invoke-RestMethod -Uri "$JamfUrl/api/v1/computers-inventory" -Headers $Headers -Method Get
# Initialize export object$ExportData = @()
foreach ($Computer in $Computers.results) {    $ComputerName = $Computer.general.name    foreach ($App in $Computer.software.applications) {        $ExportData += [PSCustomObject]@{            "Device Name"        = $ComputerName            "Software Name"      = $App.name            "Software Version"   = $App.version            "Software Publisher" = $App.publisher        }    }}
# Export to CSV$ExportPath = "C:\Exports\JamfPro_SIM_Export.csv"$ExportData | Export-Csv -Path $ExportPath -NoTypeInformation -Encoding UTF8
Write-Host "Export complete: $ExportPath"
This script authenticates to Jamf Pro, retrieves all computers and their installed software, and exports the data in the required SIM Template format.
Exporting to CSV
- For UI Method: The export is created directly from Advanced Search → Export → CSV. Save as
JamfPro_SIM_Export.csv. - For API Method: The PowerShell script automatically saves the CSV file to your chosen export path.
Ensure the resulting CSV includes the following headers:
Device Name,Software Name,Software Version,Software PublisherPreparing for SIM Import
- Open the Licenseware SIM Template.
- Paste or import the CSV data.
Ensure no blank or extra columns remain before saving.
Then upload it on the SIM - Template data source. See SIM template.
Troubleshooting
Section titled “Troubleshooting”| Issue | Cause | Resolution |
|---|---|---|
| Empty export or missing devices | Devices have not reported recent inventory | Run sudo jamf recon on clients and re-export. |
| Missing publisher data | Not all macOS apps contain publisher metadata | Manually populate missing values before import. |
| 401 Unauthorized (API) | Invalid credentials or expired token | Regenerate API token and retry. |
| Partial data returned | Pagination not handled in API script | Modify the script to handle totalCount and iterate through pages. |
| Encoding issues | CSV not saved as UTF-8 | Ensure UTF-8 encoding before importing into the SIM Template. |
Example output
Section titled “Example output”Device Name,Software Name,Software Version,Software PublisherMBP-001,Google Chrome,129.0.6668.90,Google LLCMBP-002,Microsoft Teams,1.7.00.12345,Microsoft CorporationMBP-003,Slack,4.39.95,Slack TechnologiesIMAC-01,Adobe Acrobat DC,24.002.20933,Adobe Inc.